Wednesday, December 16, 2009

What a day!

Hi everybody,
I didn't want you to think I've forgotten about all of you again, but our car BLEW UP this morning, so it might be a few days before I get to craft and post here as I will be looking for a new car for us.
We knew this day was coming, but we where hoping to make it into spring before it did actually happen.

So no crafty project, but I did want to let you know about a couple upcoming events, so here you go.


Card Keeper Organizer Class


Get organized for the New Year!

Thursday January 14th

6:30pm

Class fee: $35.00 (includes card keeper, pack of designer paper & mini glue dots)

RSVP with payment due by: Dec 29th

Please bring your adhesive & a paper trimmer

Options: Birthday card keeper or Occasion card keeper

Paper option: cottage wall, razzleberry, bella bleu, thoroughly modern


All the dividers will be decorated as well. You have your choice of either a birthday card keeper, which would include 12 dividers. Each divider will have the month of the year on it with a line for each day so you can add people's birthdays and anniversaries.
The other option is an occasion card keeper. Each divider will have an occasion on it such as Thinking of you, Get well soon, Thank you, Happy birthday.

When you register for the class please include which option card keeper you would like to do and which designer paper pack you would like. You can choose from the ones listed above.

REGISTER A GUEST AND PICK A PRIZE OUT OF MY GIFT BASKET!


 VALENTINES PUNCH CLASS


Thursday January 28th

6:30 pm

Class fee: Option #1 $48.00(Full heart punch or any $15.95 punch, heart treat cups, and Sweetheart stamp set a $47.49 value)

Or

Option #2 $30.00 with a $15.95 punch of your choice

Or

Option #3 $20.00 (come make the fun projects)

Registration w/payment due by: January 5th


REGISTER A FRIEND AND PICK A GIFT OUT OF MY GIFT BASKET!


Have a great day and happy stampin!
Angela

Monday, December 14, 2009

More "happy mail"

Hi everyone, how are you today? I've been busily getting ready for stamp club. Can't wait for tonight!
Today I have some cards to show you that I've received in the last few days. They are all so beautiful. Boy do I have some talented customers!
This first card is from my customer Patt and what you probably can't see in the picture is that she embossed the words and the trees! The words are white embossed and the trees are silver embossed. This color combination is fantastic! I believe it's night of navy, black and pale plum and what a statement it makes. I'll have to give it a try sometime. Thank you Patt for the beautiful card.

This next card is from another customer, Jen. She did such a great job on this card. If you check out the holiday mini catalog you'll see a version of this card in there. Such a beautiful card. This is a 3x6 card. This is another great color combination too. Thanks Jen for the great card.

This next card is from another customer, Carol. Carol spent a lot of time on this beautiful card. What detail. The picture does this card no justice. The lighting wasn't quite right for this one. All the green you see is glitter! And we know how much I love glitter. The stamp she used is a very detailed stamp that takes a lot of coloring. The second picture that you will see is the inside of the card. I had to show you the inside of the card because there is so many details in there as well. Carol used her big shot a lot on this card! Thank you Carol for this beautiful card.


I hope you enjoyed looking at these cards as much as I did.
Have a great day and happy stampin!
Angela

Sunday, December 13, 2009

Come join us at stamp club!

Today I have a sample for you of the card that we will be making at stamp club. If you are interested in joining stamp club we start tomorrow and we still have room for a couple more people.
This card is a total case of this super talented ladies card.  I saw how beautiful it was and had to recreate it. So I figured this would be a fun one for the club ladies to do.
So if you don't  have anything to do tomorrow at either 1:00 or 7:00 pm bring your adhesive and come make this beautiful card for a $5.00 supply fee or free with a $25.00 purchase. Please let me know by Monday morning if you plan on joining us.


I used my big shot machine to make this beautiful, intricate snowflake. I  love me big shot, it's my absolutely favorite crafting tool and glitter runs a close second place. Yeah for me that I got to use both of my favorite tools on one card.

If you are interested in purchasing a big shot, then maybe the big shot club is for you.  Receive hostess benefits, a monthly payment plan for your big shot and a great free big shot party at the end of club where you will learn to make 3 fun projects with your big shot.
Contact me for more info on my big shot club. I can be reached at 413-863-3166 or c_riddell@comcast.net

That's it for today, it just started snowing here and I'm going to sit down by the fire, watch a Christmas movie and enjoy the beautiful snow coming down outside, all while my little ones nap.

Have a great day and happy stampin!
Angela

Saturday, December 12, 2009

12 Days of Christmas sale is on NOW!

12 Days of Christmas Promotion

Stampin Up has done it again! Now until Dec 22nd all sorts of different Big Shot dies are on sale 15% to 25% off.
To see all of the dies that are on sale hop on over to my SU website and click on "shop now" in the upper right hand corner. From there you will be able to see all of the big shot products that are on sale, as well as all of our other fantastic Stampin Up products.
To place an order, call me at 413-863-3166, email me at c_riddell@comcast.net or simply shop on line at
my on line store.

I do have an order going in Monday, if anybody would like to place an order to get here in time for Christmas, I suggest that you have your orders to me by 9:00 pm Monday night.

That's it for today.
Have a great day and happy stampin!
Angela

Thursday, December 10, 2009

I forgot the "happy mail"

Hey everybody,
busy, busy day today, but I realized that I forgot to post the happy mail yesterday like I said I would. So here is a card I received in the mail, this one is from my sister. Lucky lady had the chance to go on a cruise this week so she had to get her Christmas cards done before she went. She used her big shot to cut out the big snowflake and I love the silver embosses greeting on the front. She also used the ornament punch and matching stamp set from the mini catalog. How creative!

I love how she did the random snowflakes from the stamp set snow swirled, pretty cool.

That's it for today, be sure to check back tomorrow to see the details about Stampin Up's newest promotion 12 days of Christmas, it starts tomorrow and  you'll be able to get all the details right here.

Have a great day and happy stampin!
Angela
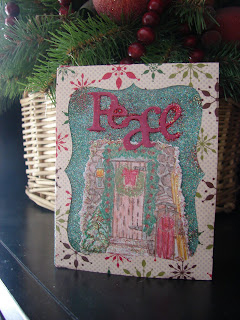
Wednesday, December 9, 2009

Snow, Snow, Snow

Have you watched the movie white Christmas? My title today reminds me of one of the songs in that movie. I love that movie. We had a tradition that we would watch this movie every Thanksgiving night when I was a teenager, boy I haven't done that in a long time.
Today I have some samples for you. One is what I lovingly like to call "happy mail" and the other 2 are from my annual Demonstrator Christmas party. (Just another reason why it's good to be a Stampin Up Demo)
This year we had a shoebox swap, where everybody makes a project and brings enough supplies for everybody to make that card. I did the stocking that I showed here on my blog on Thanksgiving day.
Here are 2 more projects that we did.

This first card was done by Laura F. I love the bright colors, she also had a different stamp that we could use inplace of the razzle dazzle, but I don't have this stamp set, so I thought I'd play with this one.


This card was done by Mel A. It's a beautiful Christmas card. It's such a simple technique that gives you a great impact on your card.
We used the big shot machine to make the card. We used it to emboss the red cardstock and we also used it to cut out the beautiful shape of the quilt.
Stampin UP had a great Big shot bundle right now in our Holiday gift giving guide with all the tools you would need to get strated. If you would like to purchase the big shot, call or email me. If ordered by Monday it could even be delivered by Christmas.

Or if you would like to purchase a big shot, but can't pay for it all at one time then join one of my big shot club. Spread your payments out over several months, and receive free hostess benefits all at the same time.
Call me at 413-863-3166 or email me at c_riddell@comcast.net to get more information on a big shot club.

That's it for today, enjoy your day. I'm going to enjoy the beautiful snow coming down outside.
Have a great day and happy stampin!
Angela

Monday, December 7, 2009

Blinged out brads!

Hello everyone, how are ya? We had snow here Saturday night, it was so nice. Except for the sliding off the road into a ditch on my way home from a workshop. That part was not nice at all. Luckily the vehicle and I where find, not a scratch on it. Today I have a Christmas card for you. It's a very simple, quick one. The entire card probably took less then 10 mins. to put together including the making of the glittery brads. Make sure to check out my newsletter which will be coming out in the next couple of days to see step by step instructions on how you can make your own glitter brads with stuff you might have on hand. That way you don't have to go out and find glittery brads and then pay an arm and a leg for them.
If you don't get my email newsletter there is still time to sign up before I send it out for the month. Just add your email address over on the right hand column where it says sign up for my newsletter, it's that simple and then you will receive your copy of the newsletter right in your in box, filled with great promotions, my class schedule and a step by step picture tutorial on a new idea every month.

Isn't she purty? Don't you love the glittered brads? What else do you see in this picture? There is a sneak peek of a new item from the upcoming spring mini catalog. Any ideas on what it is.

Angela's tips
-Adding a layer of designer paper on your card, gives added interest to the card and cuts down on time when making a card.
-Using our Stampin Up markers on a stamp gives you the opportunity to add more character to your stamped image and makes it more elaborate looking.
-Using brads on a card where you have some extra space makes the card look more complete.
- Ribbon also can also take up some of that extra space and makes your card looked more detailed and complete. (look for a ribbon share starting in January, hint, hint)

Supplies:
Cardstock: chocolate chip, shimmery white, old olive, merry moments designer paper
ink: real red and old olive markers
Stamp set: Snow swirled
accessories: old olive satin ribbon, brads, stampin dimensionals

Starting Friday for 12 days, Stampin UP is having a great sale on never discounted before products. Be sure to check back here or on my twitter page to get all the info on this fantastic sale.

That's it for today,
Have a great day and happy stampin!
Angela

Thursday, December 3, 2009

shabby chic torn flower card

The sun is shining this morning, I'm so excited! I've already gotten a good amount of things done today. Dishes are in the dishwasher and are being washed, dinner is int he crock pot, and the kids toys have been picked up twice already.
 Today I have a card for you and it has nothing to do with the holidays, can you believe it! I had a couple minutes to play last night before dinner (I love leftovers, gives me more time in the day!)
So for this card I took my color inspiration from a lands end catalog. There was  a page full of women's sweaters and one of the sweaters was purple, grey and white and of course I thought to my self that the color combo would make a fantastic card, so off to work I went making this card.
The flower is a technique that I've been wanting to try for a while now. Actually I have tried it a couple times before but was not happy with my results,  so I tried again and found that I liked the way it came out much better. The card is inspired by Dawn McVey, she's a super talented crafter and is know for her simple, shabby chic, vintage cards.
What a fun, quick, easy card this was to make. You can't tell in the picture, but the white paper is actually shimmer white paper which gives it a nice extra little touch.


Angela's tips:
-To make your flowers, tear circles of different sizes out of your favorite colors and layer.
-crumpling up gives you a totally different look with your flower layers.
-stamping on your torn flowers gives it an added interest
-to make the leaves use an oval punch. Punch once, then put the leaf back in at an angle and punch again.
-use the tip of your bone folder to make the veins of the leaf's.
-our charming stamp set from the mini catalog is perfect for making your own designer paper.


Supplies used:
cardstock: basic grey, eggplant, shimmer white, old olive
ink: eggplant, basic grey
accessories: earth elements brads, scallop edge punch, bone folder


Have a great day and happy stampin!
Angela

To place a Stampin Up order, call me at 413-863-3166 or email me at c_riddell@comcast.net or visit my online store and click on shop now in the upper right hand corner.

Wednesday, December 2, 2009

Christmas wreath & "happy mail"

Wow what a super busy day it's been today so far.  I've been calling a few husbands of some of my customers to give them their wives Stampin Up wish list to make their Christmas shopping easier. I've finished making my first batch of Christmas cards, have them in their envelopes and I just need to address them and send them on their way! Today I have a Christmas wreath idea for you. This one is on my front door. I saw the idea here, and she got it from  here who happened to see it on this site.  Wow that's a lot of linking! All you need is a wire hanger and a BUNCH of Christmas ornaments. The ornaments that I used where plastic ones, so I didn't have to worry about them breaking. I won't give you directions as the the first and last link both have directions already typed out for you.
I will say it was super fun and easy to make. The longest part was probably trying to figure out how to get the hanger put back together at the end.
I haven't added a bow yet. I have to find the perfect ribbon, but isn't it great how shiny and glittery it is! You know me and my glitter. But I do have to admit that I have glitter ALL over my house from making this wreath.


Yesterday I received my first Christmas card of the season and on top of that IT WAS A HANDMADE card! It's such a pretty card. I love the eggplant and gold together a very stunning color combination.I love how she off set the wording a little bit and added 2 colors the eggplant and gold to give it a shadowing technique. Thanks for the card Kris it made my day.

                                       
That's it for today, I'm off to make some hand made decorations for the tree. I've noticed the balance of handmade to store bought ornaments is off. That's because people have been buying my handmade ornaments right off my tree, so I'm off to make more so we can have a happy balance back on the tree.
Have a great day and happy stampin!
Angela

Tuesday, December 1, 2009

Advent Wreath?

So today starts advent! When I was a child every year we would have one of those advent calendars where you would flip open the number of each day and there would be a bible verse inside and a picture of something that had to do with Christmas. Well today is Dec 1st and I realized yesterday that I wanted to make an advent calendar of sorts for my girls. OF course I had to do it my way though. So here is what I did. It's an easy project, just time consuming. I worked on it yesterday during Hannah's nap time and then again when they went to bed for the night and then finished it up this morning. It probably took between 4 & 5 hours to complete the entire thing.
Each numbered day is a little tin that I covered in designer paper. Inside is a little treat for each of them (small things like holiday erasers, little plastic rings) as well as 2 puzzle pieces. I bough 2 puzzles thinking that they would be small enough to fit into the tins, which they are but it worked out perfectly that there are 24 pieces in each puzzle, so they will each get a puzzle piece each day for the first 24 days and then on Christmas we will put the puzzles together as a family. I also printed out a bible verse to put in each tin.
The tins are embellished with buttons, brads, rhinestone brads and the little felt flurries from last year. (I think there is still some of those left in the clearance store on my website if your interested in them.
I just loved putting this together and I love the way it turned out.
Here is wreath #1

Here is wreath #2 ( I used 2 wreaths because that's just how I already how the wreaths. You could fit them all on 1 wreath if you wanted to).


Here are the 2 wreaths together. Don't mind the play structure in the background. We can't get that top to stay on for the life of us. Every time it's windy it blows off.


And here is a close up of a few of the tins so you can see the different embellishments I used on them.


I guess that's it for today.
I hope you enjoyed my post today.
Have a great day and happy stampin!
Angela