Sorry for the lack of blog posts this week. It's been a very busy week. Kayla has been home from school, the baby I watch has been changing her schedule on me and I've been getting ready for my mother in laws surprise 60th birthday party which will be tomorrow. So I have not had any time to get any stamping in. The only stamping I've gotten in this week, was thank you notes for my stamp club members and you already saw that card. It was the happy birthday card with the flowers from the sale-a-bration stamp set, I just changed the words from happy birthday to thank you.
Anyway I have a promotion for you for the weekend!
I've been using my shimmer paint mist like crazy, that I made a couple weeks ago. So here is the deal.
Place an order of $100.00 or more (before s&h and tax) anytime from now until Monday at 8:00pm (est) and you will receive 2 free sale-a-bration products of your choice as well as I will make you up your own bottle of shimmer paint mist. It will come ready to use in a spray bottle for you! The shimmer mist will be delivered with your order once the order comes in. The shimmer mist will be in the champagne mist color.
This shimmer paint mist is great for spraying on any of your creations to give it an extra added shimmer & bling without all the mess!
Orders can be placed by phone at 413-863-3166 or by email at c_riddell@comcast.net
If you want to see the shimmer paint in action, check back to this card I showed last week. The flowers are covered in the shimmer mist. Of course the picture really doesn't do it any justice, but you get the idea.
Enjoy the rest of your day and happy stampin!
Angela
Saturday, February 20, 2010
Wednesday, February 17, 2010
Sale-a-bration overflow
This card has a LOT of sale-a-bration products in it to say the least! This is a card that I am doing for an upcoming workshop. I wanted to keep it simple for the new stampers in the group. I actually really like this card a lot and it came together pretty quickly.


 That's it for today.
Have a great day and happy stampin!
angela


Here is a close up. Can you see the shimmer paint used to highlight the flowers?
I used a blender pen and our champagne mist. I do suggest marking your blender pen and only using it for shimmer paint after your first use. The reason for this is that the shimmer paint won't ever truely come out of the blender pen. I think if you click on the picture you'll be able to see the shimmer paint detail.

Have a great day and happy stampin!
angela
Thursday, February 11, 2010
Birthday Bliss boy card
I'm not crafty today! I tried, it wasn't happening! I was trying to do some coloring and it just wasn't working, my hands are much to shaky today and the markers that I was trying to use, need to be replaced. The tips where pretty bad.
I did come up with this card. This card, even though it is very simple, was very hard for me to do. For one the color combination is not one that I would normally use so it took a lot for me to use these colors. I also have been wanting to try out this technique called faux dry embossing and every time I do it I'm just not pleased with it, so it turned out ok on this card. Basically faux dry embossing is when you used punched out shapes and tape them on your card in the same color cardstock so that it looks like those shapes are "raised up" just like dry embossing would do to a card.
This is a stamp set from the idea book & catalog that I got for free! Did you know that this year during sale-a-bration there is a whole list of stamp sets from the catalog that you can choose for your free options. How cool is that! Stampin Up is so nice to us.

Did you notice that I used the new XL fancy flower punch from the spring occasion catalog. I love how the 13/8 & 1 1/4 circle punches fit nicely inside of it!

I also used the new perfect polka dot impressions folder from the spring occasion catalog. I love how versitile this folder is, there aren't to many limitations to it!
I also used my favorite scallop trim boarder punch, which you can get for FREE with a $50.00 stampin up order. Free is good!
That's it for today.
Have a great day and happy stampin!
Angela
Wednesday, February 10, 2010
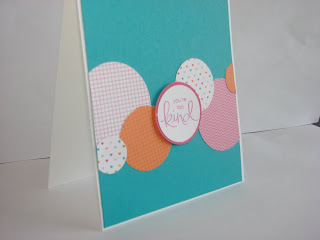
fun with circle punches
If you know me, you know that I LOVE using my punches. I think they are a quick, affective way to put a card together in a snap. Todays card was a thank you card for a dear friend of mine. She stopped by my house the other day and brought my a Dunkin Donuts carmel latte just the way I like it, for absolutely no reason. Those are the best kind of friends, they know you through and through and know how to make your day with a simple little thing like a carmel latte!
So I wanted to make her a card and didn't have much time, so out come my circle punches! It's a very simple card, but gets the point across, just fine.


So I wanted to make her a card and didn't have much time, so out come my circle punches! It's a very simple card, but gets the point across, just fine.

I used a simple base of whisper white, and then added taken with teal. For the circles I used different scraps of paper from my welcome neighbor designer paper pack (free with a $50.00 order). I also used the whimsical words sale-a-bration stamp set, right in the center of the card. I love the fact that this sentiment fits right inside my 11/4 circle punch, LOVE THIS!

The next picture is a close up so you can see that only the sentiment circle is popped up on dimensionals.

Angela's helpful hints:
-circle punches used; 13/4, 11/4, 13/8 & 1 inch circle punches
-When using punches use up your scraps of paper first, it doesn't take much paper to use our punches
-If a sentiment is the focal image of your card, pop it up on dimensionals so it really does seem like the focal point.
Are you a fan of my angelariddellstamps facebook page yet? If not you'll want to be. I started a challenge over there today, just for my facebook fans and what is the prize you might ask? Well go find out!
Have a great day and if your in W. MA today, be careful out in the snow!
Happy stampin,
Angela
Tuesday, February 9, 2010
Migrain yesterday - back today!
I had all intentions of posting here yesterday, but I had a very bad migrain and I had 2 sessions of club yesterday, so I knew something had to give so that I could be on top of my game for my club members. So unfortunately no posting to my blog happened yesterday. But I'm much better today, the headache is gone, but I still have what I call "migrain hangover".
Anyway enough about that, onto the goods!
We had stamp club yesterday and it was so much fun! We had a great time and made 2 really fun cards. One you already saw the other day (the one with the birthday presents) where they learned 3 fun easy techniques. The other one they learned 2 really fun techniques. I actually got the idea for this card from a website designed only for stampin up demonstrators, it's kind of like facebook but ALL STAMPIN UP can you imagine! Just another great reason to become a demonstrator! I unfortunately don't have a link to a website where you can see her work. I'm not even sure if she has one, but I can tell you that her name is Angela Dell'Erba.
I changed the card a little bit to suit my needs but the idea is still the same.
I think the club ladies loved this card, they where all ooohing and ahhhing over this one.


That's it for today. Enjoy your day!
Have a great day and happy stampin!
Angela
Anyway enough about that, onto the goods!
We had stamp club yesterday and it was so much fun! We had a great time and made 2 really fun cards. One you already saw the other day (the one with the birthday presents) where they learned 3 fun easy techniques. The other one they learned 2 really fun techniques. I actually got the idea for this card from a website designed only for stampin up demonstrators, it's kind of like facebook but ALL STAMPIN UP can you imagine! Just another great reason to become a demonstrator! I unfortunately don't have a link to a website where you can see her work. I'm not even sure if she has one, but I can tell you that her name is Angela Dell'Erba.
I changed the card a little bit to suit my needs but the idea is still the same.
I think the club ladies loved this card, they where all ooohing and ahhhing over this one.

We used the sale-a-bration punch scallop trim boarder punch (free with a $50.00 order) as well as whimsical words also a sale-a-bration product that can be earned with an order of $50.00!
Don't you just love those flowers?

We used rhinestone brads in the center of the flowes to give it that extra "pop".

Here's a close up of the flowers, can you see the beautiful shimmer on these babies? These things sparkle in real life! We used a mixture of rubbing alcohol and shimmer paint to get this beautiful affect!
Do you know how to make leaves without having to cut them out by hand? My club ladies learned Monday night exactly how to do that.
Maybe I'll do a tutorial later this week to show you how easy and fun it is to make these leaves.
Birthday card class- I only have a couple spots left, so if you are planning on coming. Please get me your registration and payment asap!
Birthday card class
Thursday Feb 25th
6:30 pm
Class fee: $25.00
We will be making 2 each of 5 different designed cards (that's 10 cards total).
Please bring your adhesive & dimensionals.
That's it for today. Enjoy your day!
Have a great day and happy stampin!
Angela
Friday, February 5, 2010
Stamp Club project for Monday
As you can tell, from the lack of posts this week, I have not had much stamping time. The things I have had time to stamp I can't share with you yet. But I can share with you one of the projects that we will be doing at club on Monday.
On this card there are 3 different techniques that the ladies will be learning, but I won't be sharing the details today, because I want my club members to be able to learn them first! Just another perk of being a club member.
If you would like to join us Monday please let me know by Sunday and don't forget to bring your own adhesive. There is a $5.00 non member supply fee, which is waived with an order of $25.00 or more.


That's it for today, have a fantastic weekend and happy stampin!
Angela
On this card there are 3 different techniques that the ladies will be learning, but I won't be sharing the details today, because I want my club members to be able to learn them first! Just another perk of being a club member.
If you would like to join us Monday please let me know by Sunday and don't forget to bring your own adhesive. There is a $5.00 non member supply fee, which is waived with an order of $25.00 or more.


I used 3 different sale-a-bration products on this card. Can you spot all 3?
Leave me a comment with your guesses and I'll pick from all the right answers and you will get this card mailed to you, to add to your stash of cards. I'd also love to hear what your favorite sale-a-bration product is this year. I'll leave this open until Monday Feb 8th at 8:00 pm. Please make sure to leave your email address so I can email you to get your snail mail address.
Angela
Tuesday, February 2, 2010
February Thank You's
Hi everyone, it's been a few days sense I posted last. I haven't had much time for stamping. Last night I had a demonstrator meeting, so I've been spending some time getting ready for that. I started my demonstrator business boot camp last night for my girlies and I'm pretty excited to see where this will take them in their business.
If you've been thinking about becoming a demonstrator now is a great time. Not only will you receive the starter kit at 15% off the regular price as well as a free extra stamp set of your choice from the catalog, but you'll also be able to jump in on the training that I'm doing for my demonstrators. Give me a call if you have any questions.
Today I'm going to share with you my thank you notes for this month. This is what I will be sending out to people who place orders with me. It's what I like to call a post card style. It's not a whole card, just a front, with my note written on the front. I wanted to make it kind of valentineish but not lovey dovey, so this is what I came up with. I got the idea from Becky over at inking idaho, one of my favorite blogs to visit.

I think these are super cute. I love the pixie pink with the black, it really pops. I used the i heart hearts set. I'm telling you, I'm really not a hearts type of person, but I like this set and I love that it's not just for valentines day! I used strips of designer paper from the welcome neighbor paper pack(FREE WITH A $50.00 ORDER). I also used the new heart pinking boarder punch in the mini catalog.
I think I'll add a set of these to my Etsy store later. Be sure to check them out over there.

I started a facebook page for my Stampin Up business. Become a fan and be updated about all things Stampin UP.
That's it for today, have a great day and happy stampin!
Angela
Subscribe to:
Posts (Atom)


